Instructions
- If you do not have a blog already on your site, contact us. Otherwise, continue to the next step.
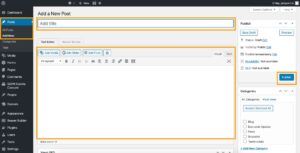
- Log in to your WordPress Dashboard.
- On the left-hand side menu, go to Posts > Add new.
- Within the top panel, write your Title.
- Within the second panel, write your content. Note that you can use headings, links, images, bullet points, quotes, and more.
- For images within the blog, use dimensions of 1024px by 685px. Note that we recommend you use images that have a file size of about 100kb because anything much larger will slow down your website. No image should be larger than 200kb.
- Scroll down and write an Excerpt that is one or two sentences that introduces your article.
- On the right-hand side, upload a Featured Image.
- To do this, always use images with the same dimensions so that they appear consistently on your site. We typically recommend using 2000px by 1500px or 1400px by 935px. To check what dimensions have previously been used on your site, edit your previous blog post and select the featured image. Here, you’ll be able to see the dimension size used.
- You can read more about selecting images for your site here.
- Choose a Category for your blog. Note that we don’t recommend using more than five different categories on your website.
- Under Excerpt, write a one sentence summary about the article. This will appear on your main blog page. Please note that if you cannot see the Excerpt section, follow the instructions here.
- When you’re done, select Publish at the top of the page. Your new blog will now display on the blog page of your website. In the top menu, select View Page to ensure the post displays as you intended.
Don’t want to manage updates yourself?
Purchase a support ticket package to save your team time.